ArcGIS Runtime SDK for iOS开发系列教程(7)——GeometryService与GeometryEngine使用
分享
-
2013-07-24
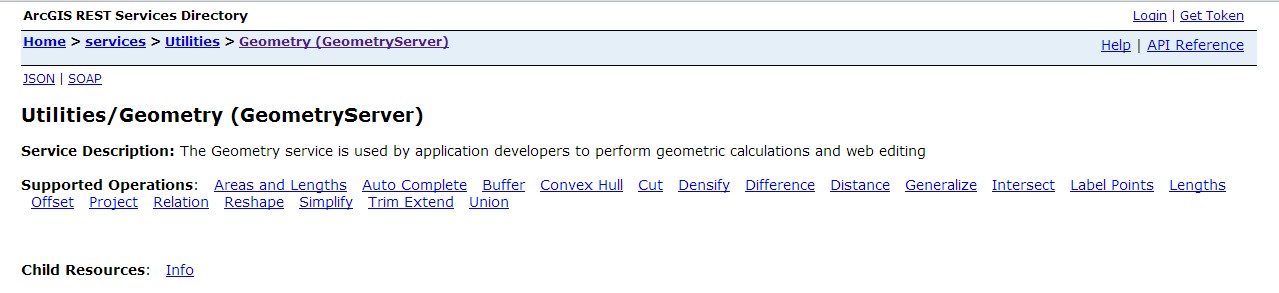
在我们使用其他WebAPIs开发应用时,常常会用到GeometryService进行空间位置判断、距离面积量测、缓冲区分析等几何操作。在ArcGIS for Server10.1中提供的GemetryService主要包括以下操作:
那么,在ArcGIS for iOS中通过使用GeometryServiceTask可以很方便地使用ArcGIS的GeometryService,它所包括的操作主要有(下图左侧):
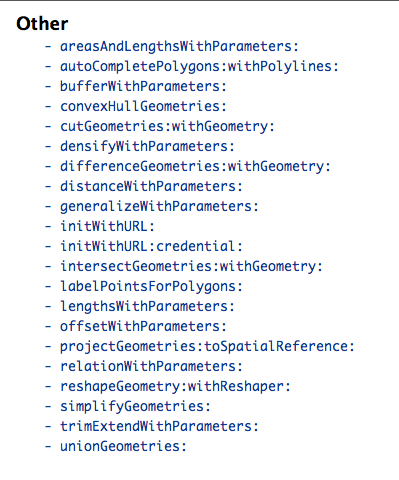

同时,在ArcGIS for iOS中还封装了本地进行几何操作的类——GeometryEngine,极大的提高了几何操作的效率。他所提供的操作主要如上图的右侧。下面我们将通过最简单的缓冲区操作来向大家展示在ArcGIS for iOS中GeometryService和GeometryEngine的使用方法。
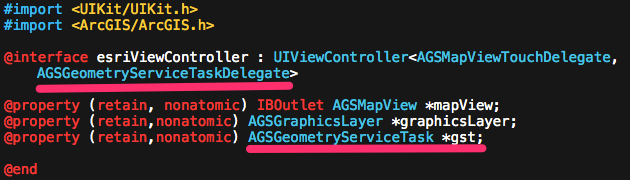
首先,我们构建一个支持ArcGIS的SDK的工程,在.h文件中添加GeometryServiceTask和相关协议GeometryServiceTaskDelegate,当然包括要素图层的添加,如下图:
有了上一讲中Tasks使用流程的实践,相信大家对使用协议的委托模式已经相当熟悉。接下来,我们需要对GeometryServicesTask进行初始化和实现GeometryServiceTaskDelegate的相关方法,首先在AGSMapViewTouchDelegate的地图点击实现方法方法中初始化GeometryServicesTask和相关参数
然后,添加GeometryService执行buffer操作的响应操作,成功返回处理:
可以看出成功执行GeometryService的buffer操作后,返回结果是数组(NSArray *)bufferedGeometries,通过遍历将Geometry转化为要素来展示。另外,我们还需要添加出错的处理:
这个与其他Tasks的提示类似,不做过多解释。这样,我们就完成了使用GeometryServiceTask来实现缓冲区分析的操作。
接下来,我们来看如何通过GeometryEngine来实现同样的操作:
我们不难发现,使用GeometryEngine实现同样的buffer操作更加便捷,如果你实际操作的话,你还好发现它的效率要比GeomertyServiceTask高很多。
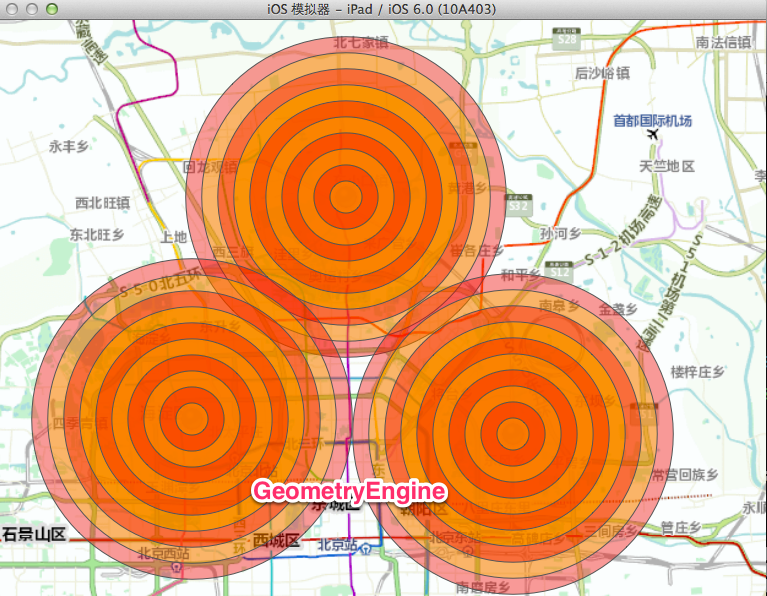
效果:

总结:本讲主要通过GeometryServiceTask和GeometryEngine的使用来向大家展示在ArcGIS for iOS中如何实现几何相关的操作,其他具体操作,如长度计算、面积量测等大家可以参考帮助文档。下一讲将向大家介绍Geoprocessor相关的操作,欢迎大家继续关注!
文章来源:http://www.cnblogs.com/esrichina/archive/2012/11/14/2770779.html
那么,在ArcGIS for iOS中通过使用GeometryServiceTask可以很方便地使用ArcGIS的GeometryService,它所包括的操作主要有(下图左侧):
同时,在ArcGIS for iOS中还封装了本地进行几何操作的类——GeometryEngine,极大的提高了几何操作的效率。他所提供的操作主要如上图的右侧。下面我们将通过最简单的缓冲区操作来向大家展示在ArcGIS for iOS中GeometryService和GeometryEngine的使用方法。
首先,我们构建一个支持ArcGIS的SDK的工程,在.h文件中添加GeometryServiceTask和相关协议GeometryServiceTaskDelegate,当然包括要素图层的添加,如下图:
有了上一讲中Tasks使用流程的实践,相信大家对使用协议的委托模式已经相当熟悉。接下来,我们需要对GeometryServicesTask进行初始化和实现GeometryServiceTaskDelegate的相关方法,首先在AGSMapViewTouchDelegate的地图点击实现方法方法中初始化GeometryServicesTask和相关参数
-(void)mapView:(AGSMapView *)mapView didClickAtPoint:(CGPoint)screen mapPoint:(AGSPoint *)mappoint graphics:(NSDictionary *)graphics

{

NSMutableArray *geometryArray=[NSMutableArray array];

[geometryArray addObject:mappoint];


AGSPictureMarkerSymbol *pt=[AGSPictureMarkerSymbol pictureMarkerSymbolWithImageNamed:@"ArcGIS.bundle/GPSDisplay.png"];


AGSGraphic *pushpin=[[AGSGraphic alloc]initWithGeometry:mappoint symbol:pt attributes:nil infoTemplateDelegate:nil];

[_graphicsLayer addGraphic:pushpin];

[pushpin release];


[_graphicsLayer dataChanged];


[_mapView centerAtPoint:mappoint animated:YES];


//GeometryService

self.gst=[[[AGSGeometryServiceTask alloc]initWithURL:[NSURL URLWithString:kGeometryBufferService]]autorelease];

AGSSpatialReference *sr=[[[AGSSpatialReference alloc]initWithWKID:102100 WKT:nil]autorelease];


self.gst.delegate=self;


AGSBufferParameters *bufferParams=[[AGSBufferParameters alloc]init];

bufferParams.unit=kesriSRUnit_Meter;

bufferParams.bufferSpatialReference=sr;


bufferParams.distances = [NSArray arrayWithObjects:

[NSNumber numberWithUnsignedInteger:10000],

[NSNumber numberWithUnsignedInteger:30000],

[NSNumber numberWithUnsignedInteger:50000],

nil];

bufferParams.geometries = geometryArray;

bufferParams.outSpatialReference = sr;

bufferParams.unionResults = FALSE;


[self.gst bufferWithParameters:bufferParams];

[bufferParams release];


}
然后,添加GeometryService执行buffer操作的响应操作,成功返回处理:
-(void)geometryServiceTask:(AGSGeometryServiceTask *)geometryServiceTask operation:(NSOperation *)op didReturnBufferedGeometries:(NSArray *)bufferedGeometries

{

UIAlertView *av = [[UIAlertView alloc] initWithTitle:@"GeometryService"

message:[NSString stringWithFormat:@"成功返回%d个缓冲区!", [bufferedGeometries count]]

delegate:self

cancelButtonTitle:@"确定"

otherButtonTitles:nil];

[av show];

[av release];


// Create a SFS for the inner buffer zone

AGSSimpleFillSymbol *innerSymbol = [AGSSimpleFillSymbol simpleFillSymbol];

innerSymbol.color = [[UIColor redColor] colorWithAlphaComponent:0.40];

innerSymbol.outline.color = [UIColor darkGrayColor];

// Create a SFS for the outer buffer zone

AGSSimpleFillSymbol *outerSymbol = [AGSSimpleFillSymbol simpleFillSymbol];

outerSymbol.color = [[UIColor yellowColor] colorWithAlphaComponent:0.25];

outerSymbol.outline.color = [UIColor darkGrayColor];

// counter to help us determine if the geometry returned is inner/outer


NSUInteger i = 0;


for (AGSGeometry* g in bufferedGeometries) {


// initialize the graphic for geometry

AGSGraphic *graphic = [[AGSGraphic alloc] initWithGeometry:g symbol:nil attributes:nil infoTemplateDelegate:nil];


// since we have 2 buffer distances, we know that 0-2 will be 100m buffer and 3-5 will be 300m buffer

if (i < [bufferedGeometries count]/2) {

graphic.symbol = innerSymbol;

}

else {

graphic.symbol = outerSymbol;

}


// add graphic to the graphic layer

[self.graphicsLayer addGraphic:graphic];


// release our alloc'd graphic

[graphic release];


// increment counter so we know which index we are at

i++;

}

// let the graphics layer know it has new graphics to draw

[self.graphicsLayer dataChanged];

}
可以看出成功执行GeometryService的buffer操作后,返回结果是数组(NSArray *)bufferedGeometries,通过遍历将Geometry转化为要素来展示。另外,我们还需要添加出错的处理:
- (void)geometryServiceTask:(AGSGeometryServiceTask *)geometryServiceTask operation:(NSOperation*)op didFailBufferWithError:(NSError *)error {

UIAlertView *av = [[UIAlertView alloc] initWithTitle:@"Error"

message:@"There was an error with the buffer task"

delegate:self

cancelButtonTitle:@"Ok"

otherButtonTitles:nil];

[av show];

[av release];

}
这个与其他Tasks的提示类似,不做过多解释。这样,我们就完成了使用GeometryServiceTask来实现缓冲区分析的操作。
接下来,我们来看如何通过GeometryEngine来实现同样的操作:
-(void)mapView:(AGSMapView *)mapView didClickAtPoint:(CGPoint)screen mapPoint:(AGSPoint *)mappoint graphics:(NSDictionary *)graphics

{

NSMutableArray *geometryArray=[NSMutableArray array];

[geometryArray addObject:mappoint];


//[_graphicsLayer removeAllGraphics];


AGSPictureMarkerSymbol *pt=[AGSPictureMarkerSymbol pictureMarkerSymbolWithImageNamed:@"ArcGIS.bundle/GPSDisplay.png"];


AGSGraphic *pushpin=[[AGSGraphic alloc]initWithGeometry:mappoint symbol:pt attributes:nil infoTemplateDelegate:nil];

[_graphicsLayer addGraphic:pushpin];

[pushpin release];


[_graphicsLayer dataChanged];


[_mapView centerAtPoint:mappoint animated:YES];

//GeometryEngine

AGSGeometryEngine *geoEng=[AGSGeometryEngine defaultGeometryEngine];


// Create a SFS for the inner buffer zone

AGSSimpleFillSymbol *innerSymbol = [AGSSimpleFillSymbol simpleFillSymbol];

innerSymbol.color = [[UIColor redColor] colorWithAlphaComponent:0.40];

innerSymbol.outline.color = [UIColor darkGrayColor];

// Create a SFS for the outer buffer zone

AGSSimpleFillSymbol *outerSymbol = [AGSSimpleFillSymbol simpleFillSymbol];

outerSymbol.color = [[UIColor yellowColor] colorWithAlphaComponent:0.25];

outerSymbol.outline.color = [UIColor darkGrayColor];


for (int i=10; i>0;i--)

{

AGSPolygon *geBuffer=[geoEng bufferGeometries:geometryArray byDistance:i*1000];

AGSGraphic *gr = [[AGSGraphic alloc] initWithGeometry:geBuffer symbol:nil attributes:nil infoTemplateDelegate:nil];

if (i%2==1)

{

gr.symbol=outerSymbol;

}

else

{

gr.symbol=innerSymbol;

}


//[self.graphicsLayer addGraphic:gr];

}


[self.graphicsLayer dataChanged];

}
我们不难发现,使用GeometryEngine实现同样的buffer操作更加便捷,如果你实际操作的话,你还好发现它的效率要比GeomertyServiceTask高很多。
效果:
总结:本讲主要通过GeometryServiceTask和GeometryEngine的使用来向大家展示在ArcGIS for iOS中如何实现几何相关的操作,其他具体操作,如长度计算、面积量测等大家可以参考帮助文档。下一讲将向大家介绍Geoprocessor相关的操作,欢迎大家继续关注!
文章来源:http://www.cnblogs.com/esrichina/archive/2012/11/14/2770779.html